
I am here to talk to you about my friend and yours, Johnny Appleseed!


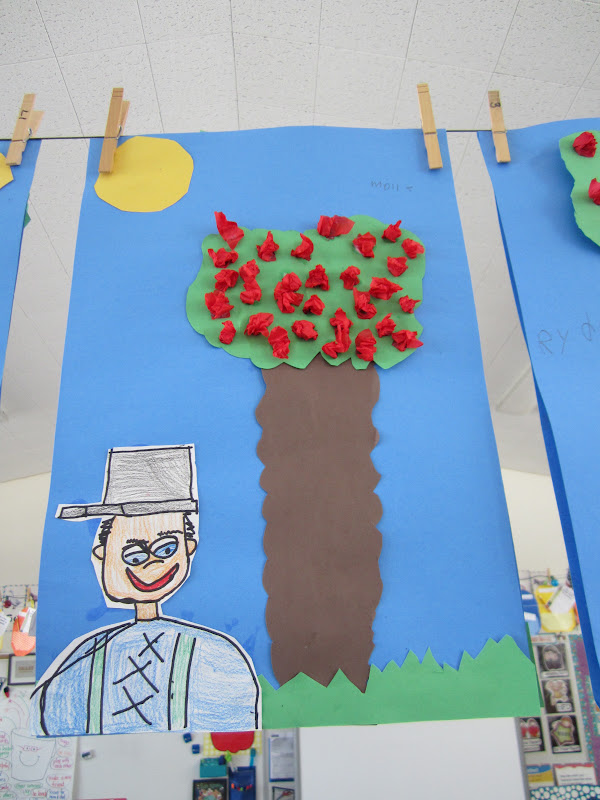
This project has 2 parts- a kid-created apple tree (I don't ever use patterns. My kiddos cut all the shapes themselves!) and a step-draw Johnny Appleseed. Last year, we created very elaborate apple trees (click here for that post) but this year, I cheaped out a TEENSY BIT and we simplified our trees, since Johnny was added to the project. :)
I ALWAYS have my kids watch me do each step first, and then I pass out the piece of paper we are working on and they follow the directions I showed them. We call it "I do, then you do." I also usually start my projects at the bottom and work my way up, to ensure that they don't run out of room for everything.
Here are the paper dimensions and steps for helping your little artists create their own apple trees (all pieces are construction paper)!
Blue background- 12 inch x 18 inch blue paper
Green grass- 2 inch x 9 inch green strip of paper. Instruct your kids to cut a zigzag, or crocodile teeth all the way down one side of the paper and then glue this to the bottom of blue paper. I always remind my babies, "No flying grass! Make sure it is glued to the very bottom of the paper!"
Brown trunk- 12 inch x 4 inch dark brown paper. This piece is cut with wavy lines up both sides of the paper. I LOVE this step because their trunks come out SOOOO WONKY. It is FABULOUS! The trunk needs to be glued under the green grass.
Green leaves- 6 inch x 9 inch green paper. First, cut a "magic oval"-meaning cut the big corners and then the baby corners off the paper. You will get a perfect oval or circle EVERY TIME! :)
After cutting the paper into an oval, cut around the edges with a wavy cut and Badaboom! You have your leaves! Glue this OVER the brown trunk.
Yellow sun- 3 inch x 3 inch yellow paper. Cut a magic square (see above. It is the same as a magic oval). This gets glued in either top corner.
Red Apples- cut 1.5 x 1.5 inch pieces of tissue paper and show your kidlets how to scrunch each piece up and glue onto tree. I even let my kiddos glue 2 (only 2!!) on the ground and 1 (only 1!!) falling out of the tree! I know, I'm so nice and generous, right??
(As you can see from exhibit A above, one of my darlings did NOT follow these directions! Grrr...)
TADA!! Very cute AND totally original apple trees! YAY!!
Now, onto Johnny. I created a little one page tutorial of this step-draw. We used a 9 inch x 6 inch piece of white construction paper for this. Again, my kids always watch me first and then do the step themselves....

Click on the picture above to a get a copy of this one page tutorial via Google Docs!
After we drew him in pencil, I let my kids use the coveted SHARPIES. Yes, it's true. They get to trace in sharpie. They feel oh-so-grown-up using these, and they are SUPER careful since I warn them that SHARPIE will NEVER EVER COME OUT, so you BETTER NOT GET IT ANYWHERE! (Strong enough warning??) At any rate, it works! They are sooooo super careful!
After the sharpies, obviously we colored him in, and I am proud to say that not ONE of my kiddos colored a green or purple face this year, which is AWESOME. I think my dire warnings and my stink eye is really working on them-HA!
The final step is called "Bubble cut" and I always cringe when I see them doing this step. It is so counter-intuitive for them NOT to cut on the lines after hearing me harp on all day about making sure they are cutting on the lines! Poor things!
The reason we bubble cut (meaning leaving a little white border around the edge) is because if they cut on the lines their all their hard SHARPIE work would go bye-bye and it would look hideous!
FINALLY, we glued Mr. Appleseed on the bottom and you have what the artsy types call "Perspective", meaning something in the foreground and something else in the background (I think??) We also talk about this fancy art word and they are impressed with themselves!
Whew!! I am tired just remembering it all!! I promise you, your kiddos will learn SOOOO much from this art project, and your classroom will be filled with original masterpieces!
Here is a little Johnny Appleseed cut and paste for you...

and don't forget my Johnny Appleseed Math and Literacy Centers...

and my Johnny Appleseed writing center...

XOXO Kerri B


6 comments:
I am so making these Johnny Appleseeds! I adore them! Thanks so much for the step-by-step directions!
Lori
Teaching With Love and Laughter
luvyorkies@gmail.com
I am def making these! They are so cute! Also, I just prepped my Math tubs with some activities from your pack that I bought last year! I'll shout it out in my post today!
Megan
Mrs. Wheeler’s First Grade
Mrs. Wheeler TpT
Kerri,
I always love your art projects because you have your students do the work. I think we will do this on Monday. Thank you!
Camille
I have this unit of yours and I love it! ♥
Thank you for the simple easy basic directions that even a non drawer like me can probably replicate! I love it.
Read about it during my conference on Lori R's blog, gathered some supplies from the paper drawer, tweaked it a tiny bit for last minute success, and bam! Artwork amazingness in the afternoon. Thank you!!!
Post a Comment