Sunday, September 29, 2013

Word of the Week Print and Go Activities!! (Plus a FREEBIE)

Good evening, Blogging Buddies!! Kerri here...

I am super excited because I just finished my latest creation...Tada!!
These Print and Go sentence scramble worksheets are the perfect INDEPENDENT Literacy activities for your Kinders and Firsties to complete on their own. Independently. Can I get an AMEN?? 

My students complete these every single week, and they love it, because they know exactly what to do, AND they are practicing learning new vocabulary and writing words and a sentence at the same time. GLORIOUS!!

Here's a closer look...

And here's a list of all of the vocabulary words that are included for the year... 50 in all!!
You can check this out in my TPT shop by clicking any of the pictures above. :)

Here's a FREEBIE Word of the Work printable that you can print out tonight and use in your literacy centers tomorrow!! Click the picture to download via Google docs...

Hope you all have a wonderful week!! Happy Fall!!

Saturday, September 28, 2013

Five for Fraturday (again with the Fraturday??)

Happy Weekend, friends! Kerri here...

Peeps, I seriously feel like Lindsay and I are neglecting this little blog! Since school has started, it has been CUH-RAZY busy like every single day. Throw an hour of yoga (Day 54 of 108!! Whoo hoo! Half way there!!) into the mix a day and there is NO time for anything. Ugh...I can't wait for things to settle down.

I am jumping on the Five for Friday Linky bandwagon again with Kacey from Doodle Bugs Teaching.

Here's a look back at our week!

1. Disneyland!! Last Saturday, my Katie Bug and I got to go to Disneyland with my mother-in-law, and sister and brother in law. It was SOOOO super awesome! I love Disneyland. LOVE IT!! 
We used to have annual passes, but now that they cost about a brazillion dollars each, we hardly ever get to go, so this was a SWEET treat for us. My older daughter is anti-Disneyland (dumb teenager!!), so I got a whole day with just Kate and me. It was great!

In line for Space Mountain-Ghost Galaxy. Super scary!!

Minnie Mouse!!

aaahhhh...Who doesn't love Captain Jack Sparrow??

 2. Finishing up our apple unit!
After making our Johnny Appleseed art and doing our Johnny Appleseed Centers last week, we all brought in apples to graph...

And then turned those apples into applesauce on Monday! Deliciousness! 


 We also learned about the life cycle of the apple and made our very first Flow Map showing the stages. After that, the kids did a cut and paste sequencing activity that I got from Cara Carroll here. Love it!!

Here are our completed and labeled cut and paste apple life cycles...


Number 3: Fall!! We have now turned our attention to all things Fall!! Here are our Fall tree tear art projects and poems that we wrote together with our "very best printing!"


Aren't they pretty? I especially love the beautiful water stain you can see on my ceiling behind the completed project-UGH!! How gross!

This next week, we will be doing lots of activities from my Falling into Autumn Math and Literacy Centers and Fall Words writing pack! Super fun...


4. I came across these Wall Pops! Write and Wipe Dots on Amazon over the summer and knew they had to be mine. These are dry erase dots that are 9 inches around and can be placed ANYWHERE-walls, tables, what have you! They have all sorts of colors, and the best part is that they are re-positionable. FABULOUS!! 
3 come in each pack, along with a fun little dry erase marker, although you can use any sort of dry erase marker on them.

Here are mine on my back table... in my color scheme of course! :)


We are going to be use these all the time to write words on, math problems, whatever the center calls for. Cool, right??
Here are some links for some of the fabulous colors they have available... aren't they sooo pretty?? I am also going to put one near my front door on the wall and every day when we exit the classroom, they will have to say the sight word of the day, or our addition fact of the day, etc...


5. I heart the boy teachers at my school! I work with 9, count them, 9 boy teachers. And they are just the best. They keep enough testosterone in the building that overrides all of the female cattiness and estrogen, and I believe this makes our staff the best staff ever. We literally all get along with each other-NO drama! You should hear our lunch room convos- lots of laughing happening! 
Well, we had a fundraiser assembly last week, and 2 of our male teachers got to dress up as penguins  and do a relay race in their costumes to get the kids excited about selling. I. ABOUT. DIED. Check 'em out...
Awwwww...penguins!!

That's all I got, Peeps!! Have a beautiful weekend!! 
XOXO Kerri B

Thursday, September 19, 2013

Good Old Johnny Appleseed!!

Happy Thursday, Bits and Bobbers!! Kerri here...

I am here to talk to you about my friend and yours, Johnny Appleseed! 


This project has 2 parts- a kid-created apple tree (I don't ever use patterns. My kiddos cut all the shapes themselves!) and a step-draw Johnny Appleseed. Last year, we created very elaborate apple trees (click here for that post) but this year, I cheaped out a TEENSY BIT and we simplified our trees, since Johnny was added to the project. :) 

I ALWAYS have my kids watch me do each step first, and then I pass out the piece of paper we are working on and they follow the directions I showed them. We call it "I do, then you do." I also usually start my projects at the bottom and work my way up, to ensure that they don't run out of room for everything.

Here are the paper dimensions and steps for helping your little artists create their own apple trees (all pieces are construction paper)!

Blue background- 12 inch x 18 inch blue paper

Green grass- 2 inch x 9 inch green strip of paper. Instruct your kids to cut a zigzag, or crocodile teeth all the way down one side of the paper and then glue this to the bottom of blue paper. I always remind my babies, "No flying grass! Make sure it is glued to the very bottom of the paper!"

Brown trunk- 12 inch x 4 inch dark brown paper. This piece is cut with wavy lines up both sides of the paper. I LOVE this step because their trunks come out SOOOO WONKY. It is FABULOUS! The trunk needs to be glued under the green grass.

Green leaves- 6 inch x 9 inch green paper. First, cut a "magic oval"-meaning cut the big corners and then the baby corners off the paper. You will get a perfect oval or circle EVERY TIME! :)
After cutting the paper into an oval, cut around the edges with a wavy cut and Badaboom! You have your leaves! Glue this OVER the brown trunk.

Yellow sun- 3 inch x 3 inch yellow paper. Cut a magic square (see above. It is the same as a magic oval). This gets glued in either top corner.

Red Apples- cut 1.5 x 1.5 inch pieces of tissue paper and show your kidlets how to scrunch each piece up and glue onto tree. I even let my kiddos glue 2 (only 2!!) on the ground and 1 (only 1!!) falling out of the tree! I know, I'm so nice and generous, right?? 

(As you can see from exhibit A above, one of my darlings did NOT follow these directions! Grrr...)

TADA!! Very cute AND totally original apple trees! YAY!!

Now, onto Johnny. I created a little one page tutorial of this step-draw. We used a 9 inch x 6 inch piece of white construction paper for this. Again, my kids always watch me first and then do the step themselves....


Click on the picture above to a get a copy of this one page tutorial via Google Docs!

After we drew him in pencil, I let my kids use the coveted SHARPIES. Yes, it's true. They get to trace in sharpie. They feel oh-so-grown-up using these, and they are SUPER careful since I warn them that SHARPIE will NEVER EVER COME OUT, so you BETTER NOT GET IT ANYWHERE! (Strong enough warning??) At any rate, it works! They are sooooo super careful!

After the sharpies, obviously we colored him in, and I am proud to say that not ONE of my kiddos colored a green or purple face this year, which is AWESOME. I think my dire warnings and my stink eye is really working on them-HA!

The final step is called "Bubble cut" and I always cringe when I see them doing this step. It is so counter-intuitive for them NOT to cut on the lines after hearing me harp on all day about making sure they are cutting on the lines! Poor things! 

The reason we bubble cut (meaning leaving a little white border around the edge) is because if they cut on the lines their all their hard SHARPIE work would go bye-bye and it would look hideous!

FINALLY, we glued Mr. Appleseed on the bottom and you have what the artsy types call "Perspective", meaning something in the foreground and something else in the background (I think??) We also talk about this fancy art word and they are impressed with themselves!

Whew!! I am tired just remembering it all!! I promise you, your kiddos will learn SOOOO much from this art project, and your classroom will be filled with original masterpieces!

Here is a little Johnny Appleseed cut and paste for you...


and don't forget my Johnny Appleseed Math and Literacy Centers...

and my Johnny Appleseed writing center...


XOXO Kerri B


Saturday, September 14, 2013

Five for Fraturday!! (FREEBIES here)

Happy Saturday, Peeps! Kerri here...

Well, I am jumping back on the Doodle Bugs "Five for Friday" linky party, except that I was SO. DARN. EXHAUSTED last night that my post will have to be a Five for Fraturday post!

1. We have been hard at work in first grade and it is only the 2nd week of school! This past week we focused on our color words...
 We made our rainbow name art and they came out soooo cute!! My student teacher has AMAZING printing skills, so she wrote all of the names on the black paper for me with her mad skills, and they are even cuter than ever!! LOVE them!

 We also made a color graph counting color tiles and they kiddos did fabulous ! 
Click here for a copy of this graph...


2. We met our third grade buddies for the first time this week! They come over to our class every Wednesday after lunch since we have early out on Wednesday, and there is only a half an hour after lunch anyway. They read to my kids, help them finish work, do art projects...It is GLORIOUS!


3. We have been hard at work working with our CVC words and reviewing what we learned in Kindergarten. This week we used my Bodacious Blending Mats-cvc edition. The kids did fabulous!


4.  We have a new Math program this year called SWUN math. I started teaching place value on day 2! Yes, day 2!! 
Building and Recognizing Numbers to 100 using Base 10 Blocks is our first unit~
For some of my babies, it was HARD, but for some of them, it was easy breezy. We played the place value game with dice (roll 2 dice, see what two numbers you get-for example 6 and 2 is 62, and then draw the 10's and 1's.) It took a couple of tries but finally they were all really getting it! YAY!


5. Because we have moved to common core math this year, we needed a 120 number chart, so I decided to make my own and have it blown up to poster size through our district for $10. Costco also can make posters for about the same price. Here is mine hanging in my room...

If you are interested in this, I have attached a few different color choices for you to make into a poster size, plus a blackline if you want to print it and laminate them for your kidlets' personal use! Enjoy!!


And, didn't our Chicka Boom Trees come out so cute??

Off to my yoga mat!! See ya, friends!
XOXO Kerri B

Sunday, September 8, 2013

Kerri B's Classroom Reveal!!

Good Morning, Bits and Bobbers! Kerri here...

I survived my first week! I have three words to sum up last week-HOT, HOTTER, HOTTEST! I cannot remember a muggier, sweatier opening of the school year. Seriously, it was gross. My poor firsties were literally melting. 

For the most part, being right up the hill from the beach, we really don't need air conditioning, but DANG, we needed it last week!! 

And then, yesterday, we drove to Irwindale, CA where is was over 100 degrees to watch my daughter's cross country meet. Yes, you read that right. Hundreds of poor high schoolers running 3 miles in 100 degree weather. They finally had to call the race off because 8 kids fainted and had to be taken to the hospital. I'm serious!! 
It was B-A-N-A-N-A-S!!

Okay, I feel like I am like a month behind everyone else's classroom tours, but I FINALLY took pictures of my finished classroom to share with you all!


My guided reading corner. I love love love my new red teacher chair from Walmart!

My back to school bulletin board. I love my vintage Peanuts Gang kids. My 5th grade teacher gave them to me when she retired! 
Here is our Wowzville Writing Board, with my organized bin up top. LOVE IT! 
This is my Welcome Center, right inside my front door

We have a bulletin board on our front door. It changes monthly, and the parents sign up to design it each month!

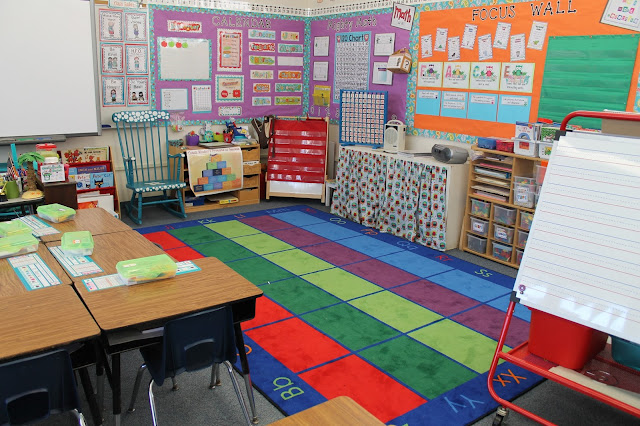
Here is my carpet area. I love my new carpet and my cute owl curtain covering hiding all my teaching materials...

My library. It is my favorite area!

Calendar and Math Wall

Focus Wall-the reading strategy posters were a freebie from Cara Carroll last year.  My spelling words and chunk of the week will go on the green pocket chart.

Our WOnderful Word Wall. Oops! Still have words up from last year. Maybe I'll take those down?? :)

My computer station and behavior chart. I think I bought the chart from First Grade Owls...

Teacher Corner!

I love my classroom rules sign. I'll be blogging about this this week!!

I double love this vinyl sign!!

Front of the room. Can you see my orange chair peeking out? I got it from Walmart too!

View from the back of the room

Another view from the other direction

My new stools are AWESOME! IKEA find!

Could this kid be any cuter?? 
Have a great Sunday, Peeps!
XOXO Kerri B